
How to Read My ʻUkulele Arrangements

When you open one of my arrangements, everything is laid out in a very intentional way. Once you understand the flow, you’ll be able to read any chart quickly and confidently.
Let’s go step by step.
Header Section
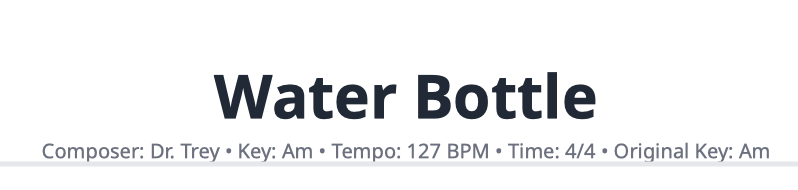
At the very top, you’ll find the Header section. This gives you a snapshot of the song before you even play a note.
It includes the song title, the composer, the key, the original key (from the version we are studying), the tempo, the time signature, and the recorded artist.
This section tells you what you’re about to play and sets the context for everything that follows.
Chords and Patterns
Right below the header is the Chords and Patterns section.
This includes a strumming pattern or a picking pattern. In many beginner and intermediate arrangements you will see strumming patterns, but picking patterns are also used throughout my arrangements.
Think of this section as the engine of the song. It determines how the music feels.
How to Read the Strumming Pattern
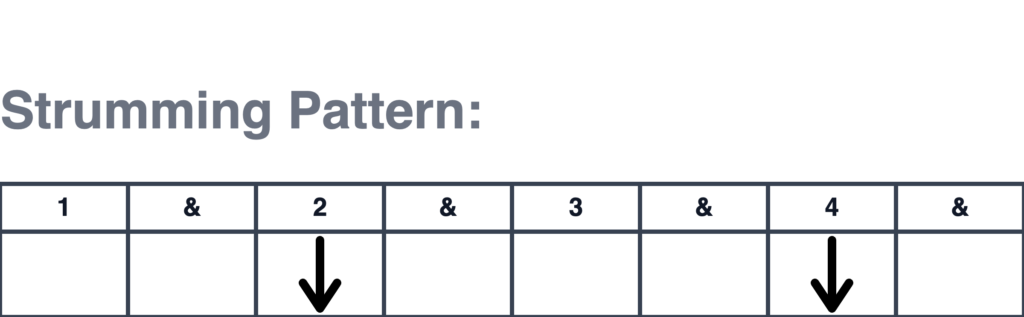
The strumming pattern is shown using a series of boxes. Each box represents a small segment of time.
In most cases, each beat is divided into two parts:
a down strum (the beat number) and an up strum (the “&”).
So in 4/4 time you will see:
1 & 2 & 3 & 4 &
That means there are 4 down strums, 4 up strums, and 8 total boxes.
The first box of each beat represents a down strum.
The second box represents an up strum.
If a box has an arrow, you play the strings in that direction.
The arrows may appear small or large. This indicates accent:
- Larger arrows = stronger, accented strums
- Smaller arrows = lighter strums
If a box has no arrow, your hand should still move in that direction. This is called a ghost strum. Your hand continues moving, but it does not touch the strings.
In addition to arrows, you may see other symbols:
- R = fan strum (rasgueado)
- X = chuck (muted percussive strum)
- 3 = triple strum
These symbols add texture and variation to the groove.
This is extremely important for timing. Your strumming hand should move like a pendulum, constantly going up and down whether you hit the strings or not.
How to Read the Picking Pattern
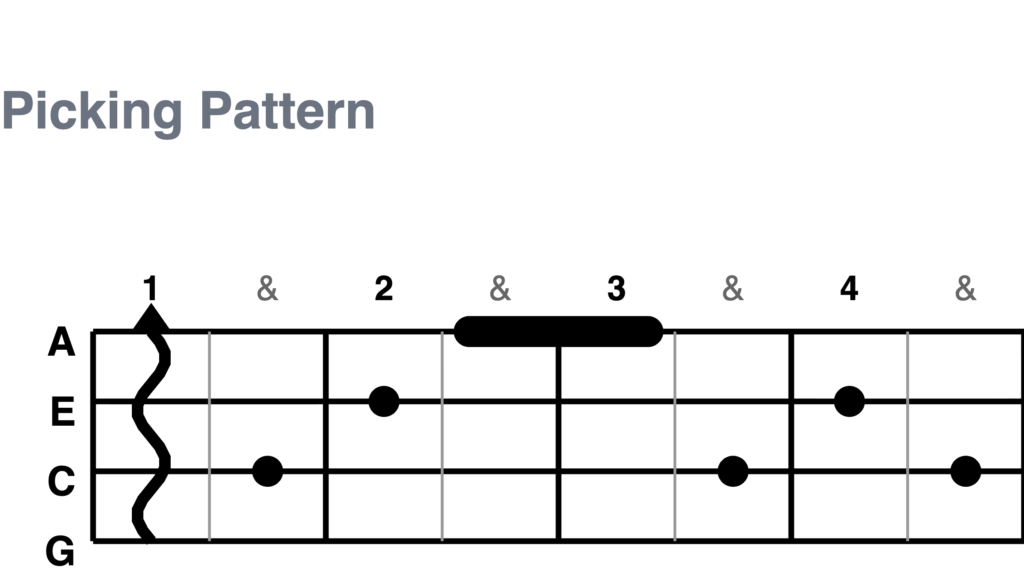
Picking patterns are written in a way that is similar to tablature.
The strings are shown with the A string on top and the G string on the bottom.
At first, this can feel backwards. When you look down at your ʻukulele while holding it, the G string is closest to your face and the A string is closest to the floor.
This diagram is not trying to match the physical height of the strings. Instead, it follows the same layout as standard tablature, which is a reading system that players learn to recognize quickly.
Across the top, you will see:
1 & 2 & 3 & 4 &
Each vertical column represents a moment in time, just like the strumming pattern.
At the beginning of this pattern you see a wavy line. This means you use your thumb and sweep down across the strings to create an arpeggio.
You will also see dots placed on specific strings. A dot tells you which string to pick and when to pick it. It does not tell you the note, because the note is determined by the chord you are holding.
Sometimes you will see a longer, pill-shaped note. This means the note is held longer. In this case the & of 2 stretches across two boxes, that equals a quarter note.
Just like strumming patterns, once you reach the & of 4, the pattern repeats.
Chord Diagrams
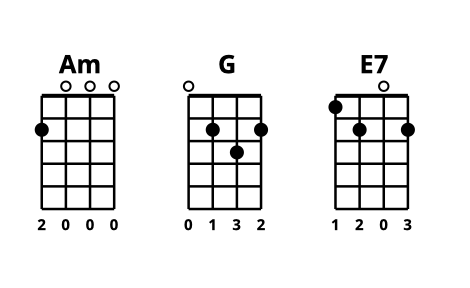
Below the patterns, you’ll find the chord diagrams used in the song.
Each diagram shows the name of the chord, open string indicators, finger positions, and which fingers to use.
This is your main reference for building the chords correctly.
Alternate & Substitute Chords
Sometimes you’ll see a section called Alternate & Substitute Chords.
This appears directly below the main chord diagrams.
These are optional variations that give you more color and flexibility.
They only appear in this section and do not appear in the inline diagrams later. This keeps the main chart clean while still offering more advanced options.
Integrated Notation & Tablature
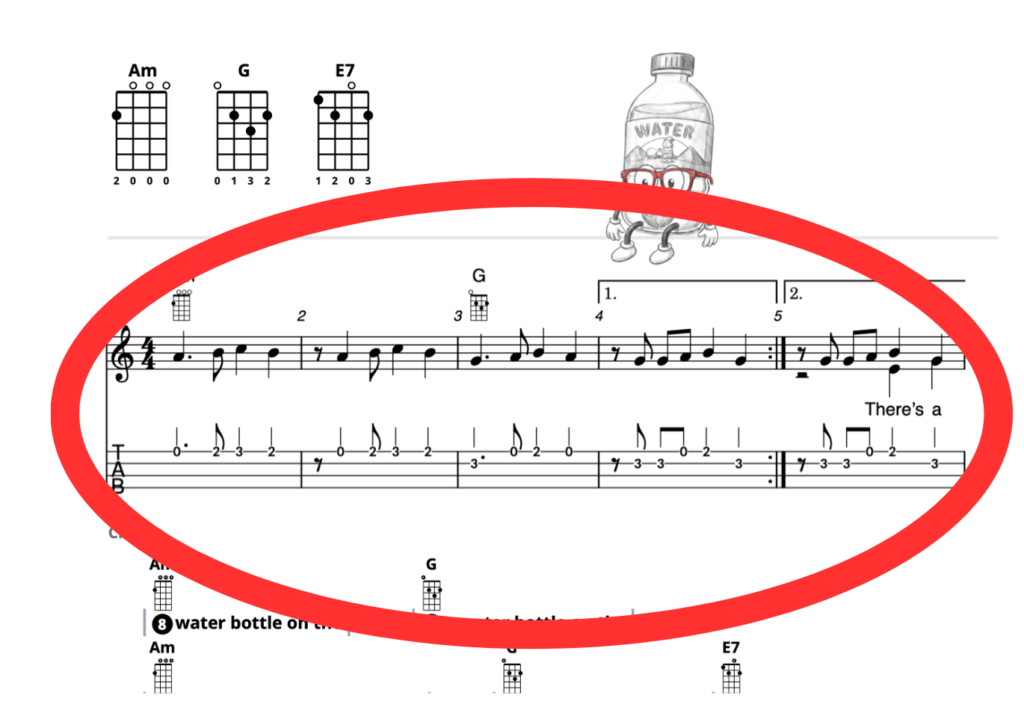
As you scroll down, you may see standard notation combined with tablature.
Not every song has this, but when it does it often features intros, interludes, solos, and outros.
This section shows the chords being used, the standard notation, and a tablature staff below it.
The tab also includes rhythm, so if you read music you know both when to play and where to play.
Lyrics with Chords
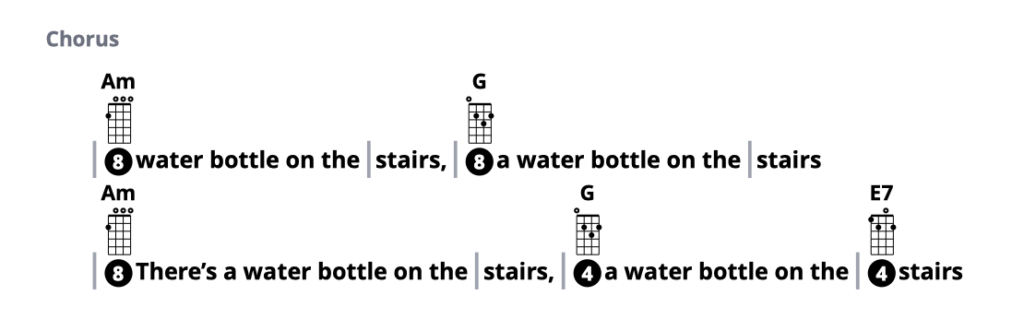
Next is the main performance section:
Each measure is divided by a barline using the symbol |.
Chords appear above the lyrics. Under each chord is a mini inline diagram so you don’t have to keep looking back to the top of the page.
Beneath the diagram are circled numbers that show how many counts to hold the chord.
This allows you to see the chord, see how to play it, and know how long to hold it all in one place.
Inline Strum Indicators
Sometimes in the music, you will see arrows underneath the inline chord diagrams. These arrows tell you the direction of a single strum at that exact moment.
↓ = one down strum
↑ = one up strum
These are not full strumming patterns. They are just one strum in that direction, placed exactly where they are needed within the song.
Think of them as precise instructions that override the pattern for that moment.
Song Analysis
At the end of the arrangement, you’ll find the analysis section.
This includes a breakdown of the harmony, scales you can use with the song, creative ideas for playing and improvisation, and additional style opportunities.
This is where you go from simply playing the song to actually understanding it.
Example: Full Arrangement
For those of you who are not students of mine but want to see what a full piece of music looks like, I’ve attached a link to a song I wrote called “Water Bottle.”
This will give you a chance to see how many of these elements are used in a real arrangement.
Not everything discussed in this post is included in that chart, but several of the concepts are implemented. Use it as a reference as you go back through this post and you’ll start to see how everything fits together.
If youʻre interested in seeing more arrangments, i set up a very casual class on google classroom during Covid that i still continue to post to and youʻre welcome to join us. Note: you need a gmail address to login to google classroom.
Final Thought
Each section builds on the one before it:
Information → Technique → Application → Understanding
If you follow the layout from top to bottom, you won’t just learn how to play the song—you’ll understand how it works.